
Ground Mats on Soft Ground: Geotextile, Derating and the Right Order of Work
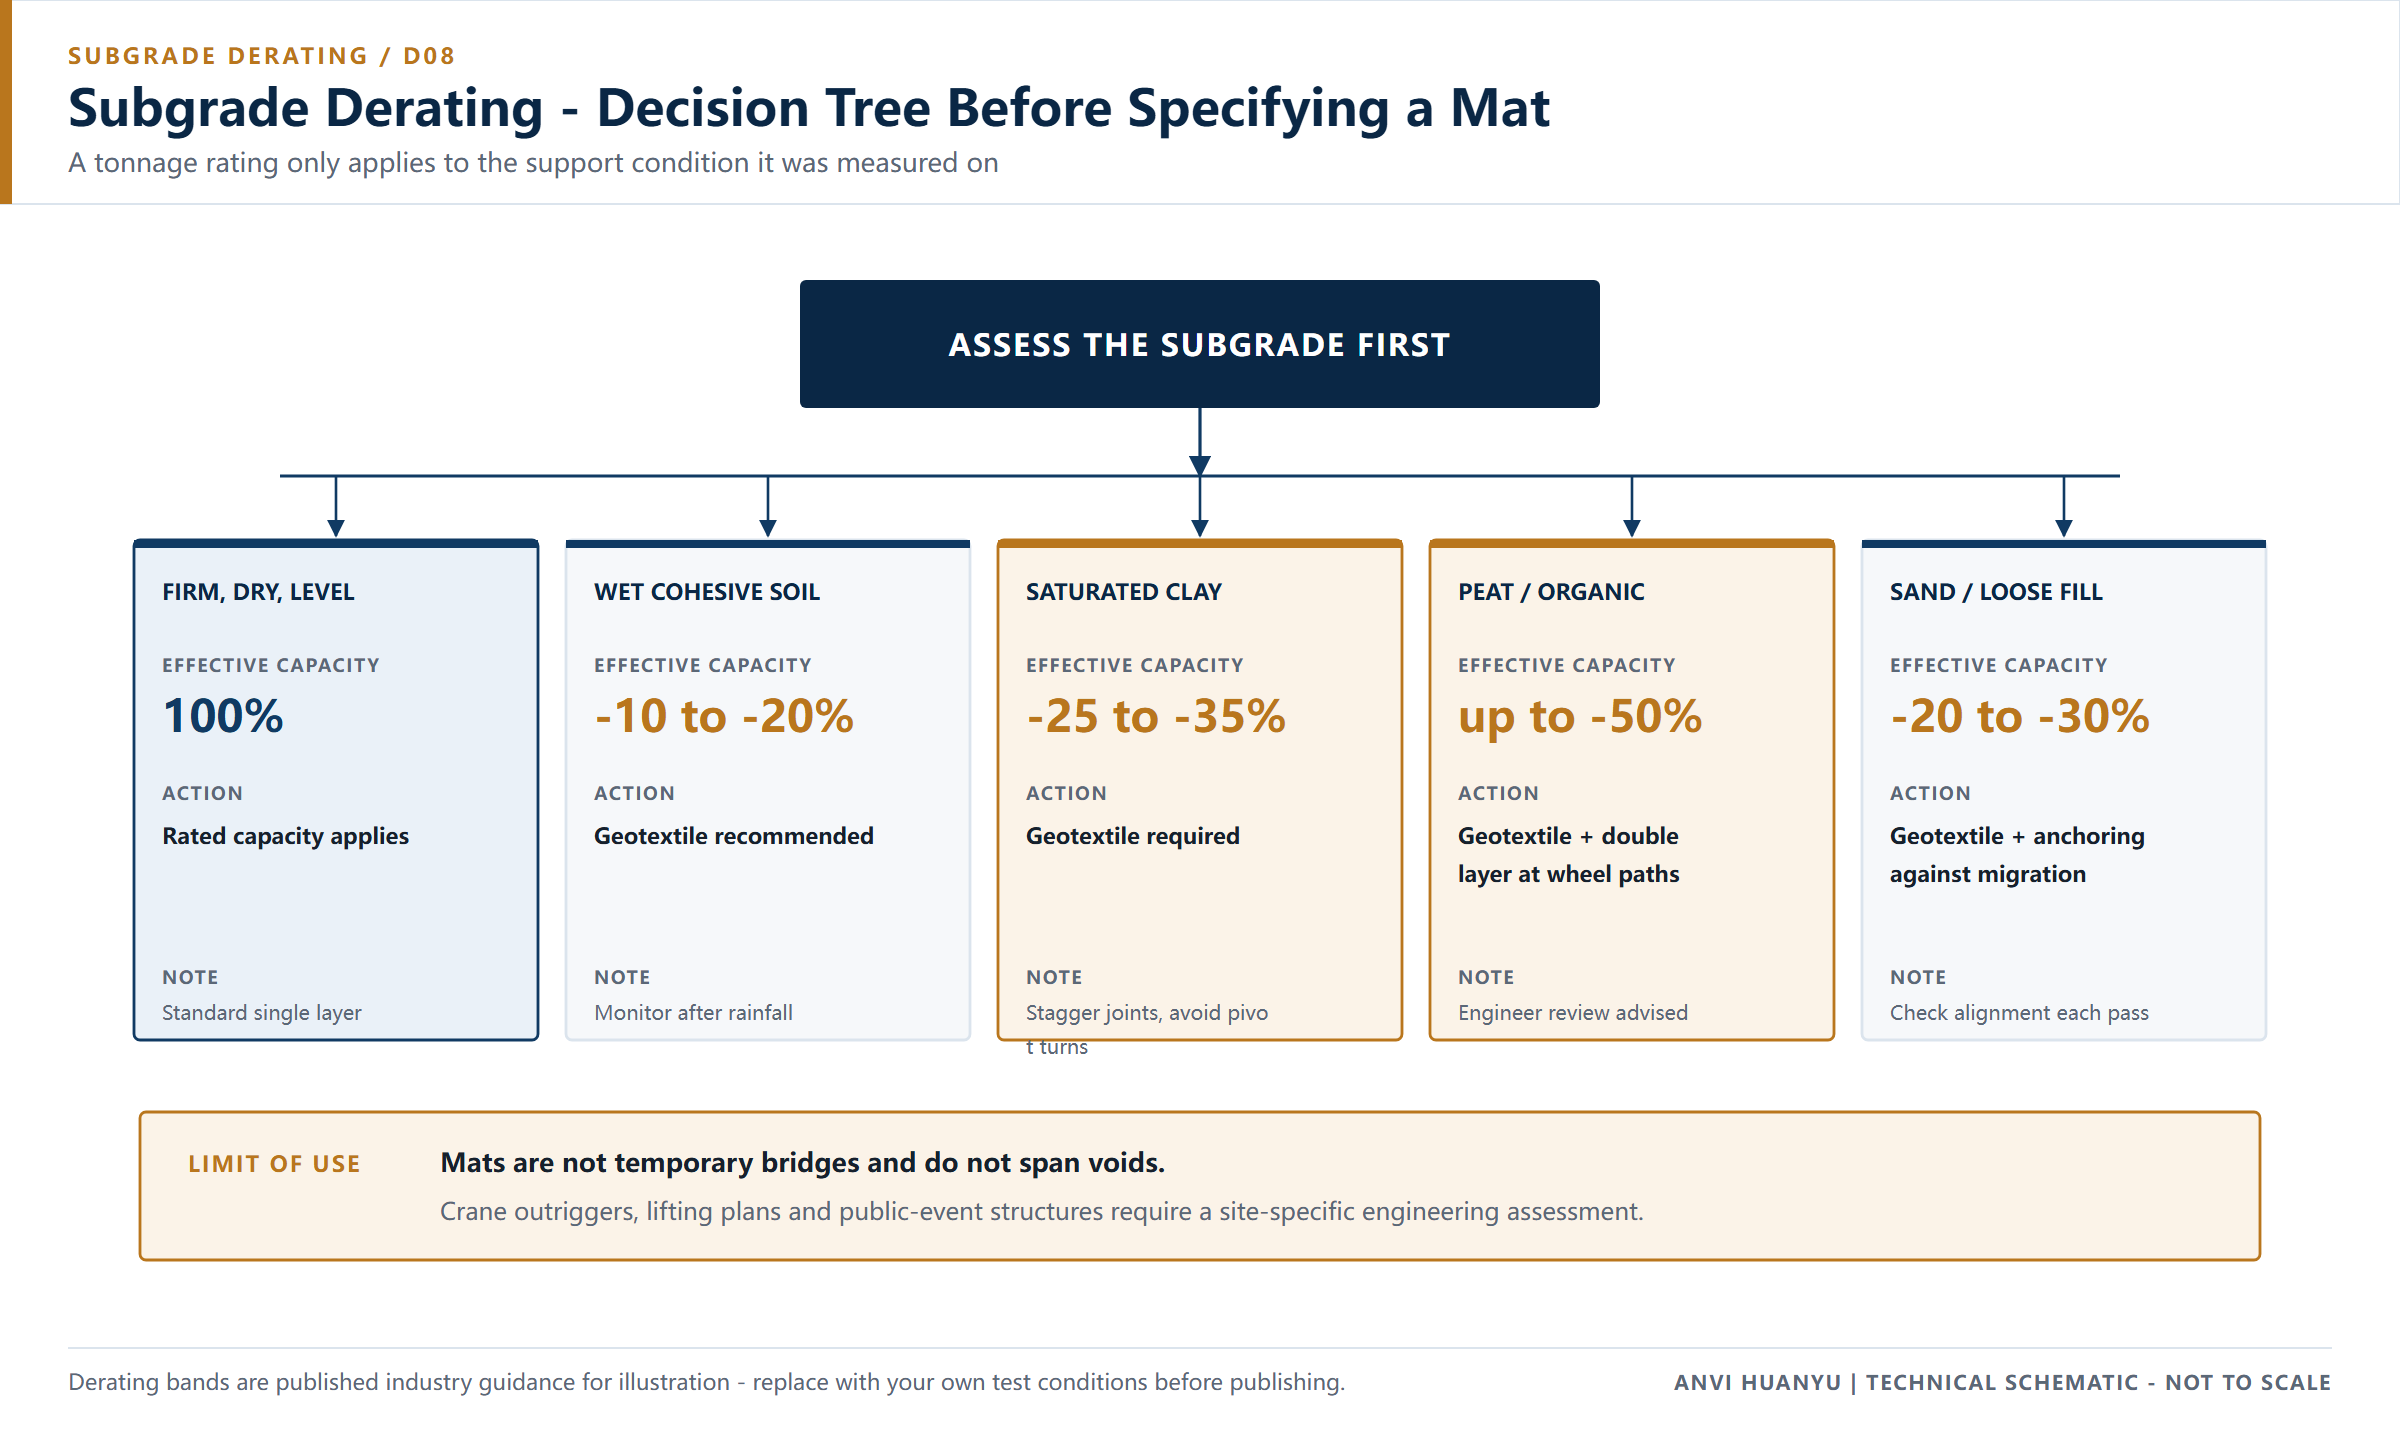
When trucks are sinking, the fix is almost never a thicker mat. The order of work is: drain the route, lay a geotextile separation layer, build the panel field with staggered joints and a double layer in the wheel paths, and only then select thickness — 20 mm is the practical ceiling for standard HDPE panels. Published industry guidance puts the bearing loss of saturated soil at 30–50% against dry compacted soil, with peat and organic ground worst affected. A stiffer board over an unprepared subgrade still deflects, migrates and sinks at the edges.
This page is about ground condition, not a project sector. It applies whether the site is a wind farm access track, a pipeline easement, a festival car park or an emergency repair. For road width, turns and continuous-traffic layout, see our temporary access roads guidance — the two pages solve different parts of the same problem.
What “soft ground” means in measurable terms
“Soft” is a description, not a specification. Before a panel order is placed, characterise the subgrade with something you can record in a site file.
| Field indicator | Typical condition | Approx. CBR | Relative bearing vs dry compacted | First action |
|---|---|---|---|---|
| Boot heel leaves no print; plant leaves no rut | Dry compacted granular | >10 | 1.00 | Standard lay, connected and staggered |
| Shallow print, slight rut after repeated passes | Damp sand / firm silty clay | 5–10 | ~0.75–0.85 | Drain, geotextile, monitor |
| 50–100 mm rut under a laden vehicle; water appears in the rut | Saturated clay | 1–3 | ~0.65–0.75 | Drain + geotextile + double wheel paths + 20 mm |
| Deep rut, waterlogged, spongy underfoot | Peat / organic topsoil / uncompacted fill | <1 | ~0.50 or less | Ground improvement or timber bog mats; HDPE alone is not recommended |
Indicative industry screening ranges only, derived from published guidance; they are not geotechnical design values. A site-specific assessment must set the actual allowable bearing pressure and derating.
Three cheap checks help before any calculation:
- Rut depth after one laden pass — the most honest indicator of what the ground will do under repeated traffic.
- Water behaviour — does water appear in the rut within minutes? That is a pumping subgrade, not just a wet surface.
- Uniformity — a route with one soft hollow is worse than a uniformly weak route, because the hollow creates an unsupported span. Mark and treat these separately.
The load figure printed on a product page assumes firm, level support. Our published 80 / 100 / 120 t reference ratings for 12.7 / 15 / 20 mm are nominal figures for evenly distributed static loading on firm, level subgrade; they are not certified design values and do not apply unchanged to the conditions in this table. We publish no test method, sample thickness, support span or test report for these figures; they are labels, not design inputs.
When mats work on soft ground — and when they do not
Appropriate conditions
- Temporary access where the ground can be drained and separated from the panel field.
- Repeated light-to-heavy rubber-tyred traffic over saturated clay or wet silt, with geotextile and wheel-path doubling.
- Sites with reinstatement obligations — farmland, turf, easements — where no aggregate may be left behind.
- Wetland margins and crossings, subject to the environmental permit and a clean-in/clean-out protocol.
- Emergency works where a road must be operational within hours, not days.
Do not rely on standard HDPE panels when:
- There is no competent bearing layer — deep fluid silt, unbounded peat, or standing water with no drainage path. Mats will migrate regardless of thickness.
- The panels would bridge a ditch, culvert, trench or void. They are load spreaders, not beams.
- The route crosses flowing water or is subject to scour; panels can float or be displaced.
- Sustained steel-track traffic is expected — grousers cut HDPE; consider composite, timber or steel.
- The position is a crane outrigger or critical lift pad — that is a point-load calculation, not a ground-protection problem.
- The wetland or environmental permit is not yet issued. Ground protection does not replace a permit.
On permitted wetland work, HDPE has a genuine compliance advantage over timber: it does not absorb water, does not rot, and can be pressure-washed between sites so seed, spores and soil are not carried from one catchment to another. Build that wash step into the method statement; the permit may require it.
How to build it: the 8-step sequence and a worked panel count
Sequence
- Walk and zone the route. Mark saturated hollows, springs, buried services and the transition onto firm ground. Treat hollows separately.
- Drain first. Intercept upslope water with a cut-off drain, pump standing water, and give the route a fall. A geotextile over standing water simply holds the water in place.
- Select and roll the geotextile. Choose the grade for the soil and the expected traffic; overlap seams generously (a common site specification is ≥300 mm) and pin against wind and turning.
- Start on firm ground and build outward. Every first-row panel needs full support underneath.
- Lay the first layer with staggered joints, vehicle tread face up, and connect every panel. Linked panels resist the lateral shear that pushes loose boards apart in mud.
- Add a second layer in the wheel paths. This increases the effective load-spreading area and stiffness exactly where the axles run, at lower cost and weight than upgrading the entire field.
- Run one laden vehicle at walking pace and re-inspect for edge settlement, joint opening, migration and mud pumping. Re-tension connectors where needed.
- Recover from firm ground backwards, wash off soil and vegetation, inspect hand holes and connectors, and store flat and supported.
The full handling and recovery procedure is in how to install ground protection mats.
Worked example: 100 m single lane on saturated clay
Illustrative quantity take-off; substitute your route length and ground zone boundaries.
| Layer | Orientation | Coverage along route | Panels |
|---|---|---|---|
| First layer, 2,440 mm lane | 2,440 mm edge across the route | 1.22 m per panel | 100 ÷ 1.22 ≈ 82 |
| Second layer, two wheel paths | 1,220 mm edge across each wheel path, 2,440 mm edge along the route | 2.44 m per panel | 100 ÷ 2.44 ≈ 41 per path × 2 = 82 |
| Subtotal | 164 | ||
| Turns, soft spot patching, losses | +15% | +25 | |
| Order quantity | ≈ 189 panels | ||
| Geotextile | 100 m × 2.44 m = 244 m², plus overlap | +15% | ≈ 280 m² |
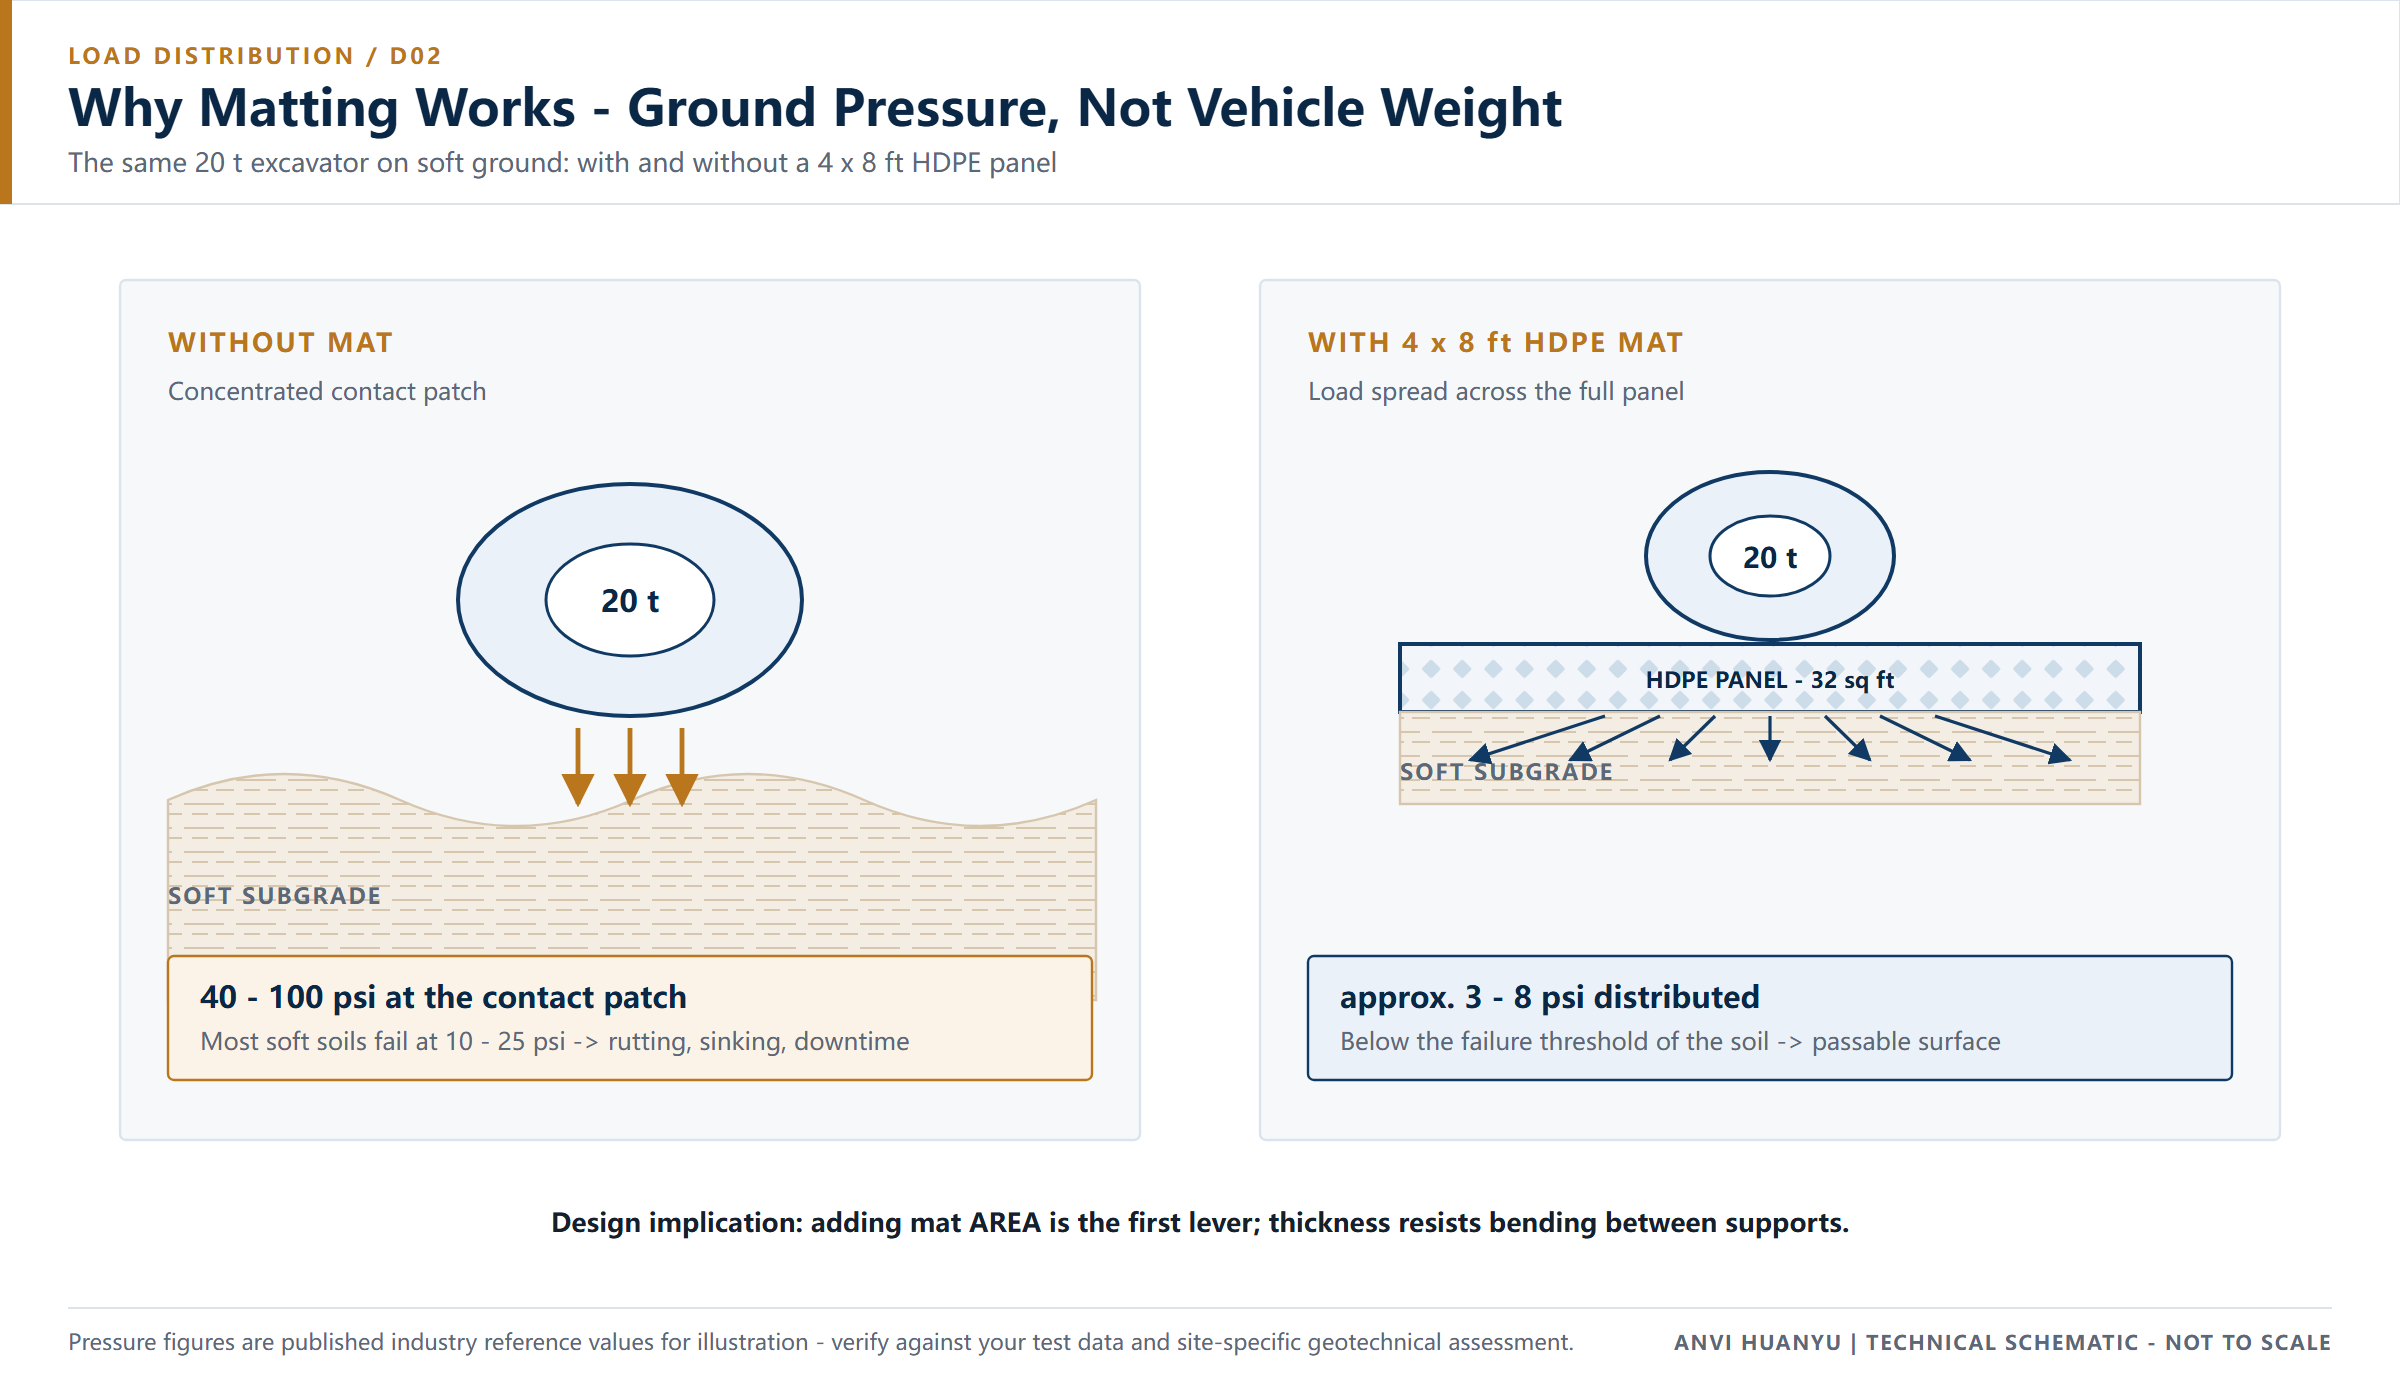
The point of this calculation is the comparison, not the total. Doubling only the wheel paths adds 82 panels; upgrading the entire 164-panel field to a thicker specification adds cost and weight to every board. On a soft subgrade, the area of ground being asked to carry the load is the binding constraint — a second layer in the loaded zones increases that area more efficiently than a stiffer board everywhere.
As a freight cross-check, published industry guidance indicates a 40 ft high-cube holds roughly 300–350 panels at 20 mm but only 200–250 at 30 mm (industry reference range, to be confirmed against actual stack height and packing method). Using mid-points, that is about 30% fewer panels per container and roughly 40% more freight per panel — before the extra resin cost.
What it saves when the alternative is a bogged site
The cost of a failed wet-weather access route is rarely the panels. It is the recovery and the programme:
| Cost line | What happens without a prepared mat road | With the sequence above |
|---|---|---|
| Recovery | Towing or excavating a bogged 30–40 t vehicle, plus a second machine | One laden trial pass, then inspection |
| Programme | Haul route closed after rain; crews and plant idle | Route remains trafficable; derating accounted for in the design |
| Ground restoration | Deep ruts, imported stone, excavate and reinstate at handover | Lift, wash, restore; no aggregate to remove |
| Repeated mobilisation | Rebuild the stone road after each wet spell | Panels redeployed to the next work front |
| Environmental | Mud tracked onto public roads; seed transfer between sites | Wash-down protocol; track-out mat at the exit |
Use the cost and ROI guide with your own day rates. The break-even on soft ground usually arrives earlier than on firm ground, because the alternative (aggregate plus reinstatement) is at its most expensive precisely where mats are being considered.
Why this mat — not a lighter panel or another material
| Option | Where it fits on wet ground | Why not here |
|---|---|---|
| 12.7 mm HDPE | Pedestrian routes, turf protection, firm ground | Deflects over a soft hollow; edges lift and joints open under repeated passes |
| 15 mm HDPE | Short-duration light plant on damp but drained soil | Marginal once rutting starts or the route is in continuous use |
| 20 mm HDPE (recommended ceiling) | Saturated clay with geotextile and doubled wheel paths | The stiffest standard panel we list — beyond this, weight and freight rise sharply |
| 25–30 mm+ HDPE | Engineered cases only | Heavier to place by hand, fewer panels per container, still does not fix the subgrade |
| Timber bog mats | Very soft ground, deep peat, one-off heavy access | Absorbs water and gains weight, can break, can carry seed/spores, harder to clean |
| Steel plates | Short high point loads | Needs lifting plant, corrodes, conductive; see HDPE vs steel mats |
| Plywood | Nothing on a wet haul route | Delaminates, swells, unpredictable — see HDPE vs plywood mats |
HDPE’s specific advantages on a wet site are unglamorous and material: it is non-absorbent, so a panel weighs the same on day 30 as on day 1; it does not rot or corrode; it can be washed and inspected between sites; and a dual-face tread lets you put the pedestrian side up where people walk and the vehicle side up where plant runs. Four hand holes make two-person placement possible on lighter sizes, and eight connector holes let the whole field act together under the lateral forces that mud generates.
The honest boundary: on deep peat or unbounded silt, timber bog mats, geogrid-reinforced stone or an engineered platform may be the right answer. Saying so is more useful to a site engineer than a universal tonnage claim.
Why 20 mm is the ceiling, not the target
Run the same selection chain as on firm ground, then insert the derating step:
Heaviest axle group → tyre contact pressure → spread over panel → SUBGRADE DERATING
→ effective bearing check → 15–20% margin → thickness conclusion
On dry compacted granular soil, the derating step is ~1.0 and the chain may conclude at 15 mm. On saturated clay the same chain loses 25–35% of the available bearing capacity; on peat, up to 50% (industry reference ranges, site verification required). That single step moves the conclusion from 15 mm to 20 mm — and then stops, because no standard panel thickness compensates for a subgrade that has no bearing layer.
Why a second layer beats a thicker single layer here: a thicker panel increases bending stiffness, but the failure mode on soft ground is usually loss of support beneath the panel, not failure of the panel itself. Doubling the wheel paths increases the engaged footprint and bridges small local soft spots, while geotextile stops the soil and the panel from mixing. Those two actions address the actual mechanism.
Three qualifications for any specification written from this page:
- Do not apply the nominal 120 t figure to wet ground. It is a published reference rating for evenly distributed static load on firm, level subgrade, not a certified design value; wet conditions require derating and a site-specific assessment.
- Confirm the thickness convention — base sheet or overall height including raised tread — because it changes stiffness, stacking height and compatibility between layers. See how to choose ground mat thickness.
- Thickness changes freight and handling. Fewer panels per container at 30 mm, heavier two-person lifts, and higher delivered cost per m² are all real — while the subgrade remains the limiting factor.
Common mis-specifications on this intent: buying a thicker mat as the first response to rutting; omitting geotextile; laying over standing water; leaving joints unconnected; using a straight (unstaggered) seam in a wheel path; and treating a published tonnage as valid on saturated clay.
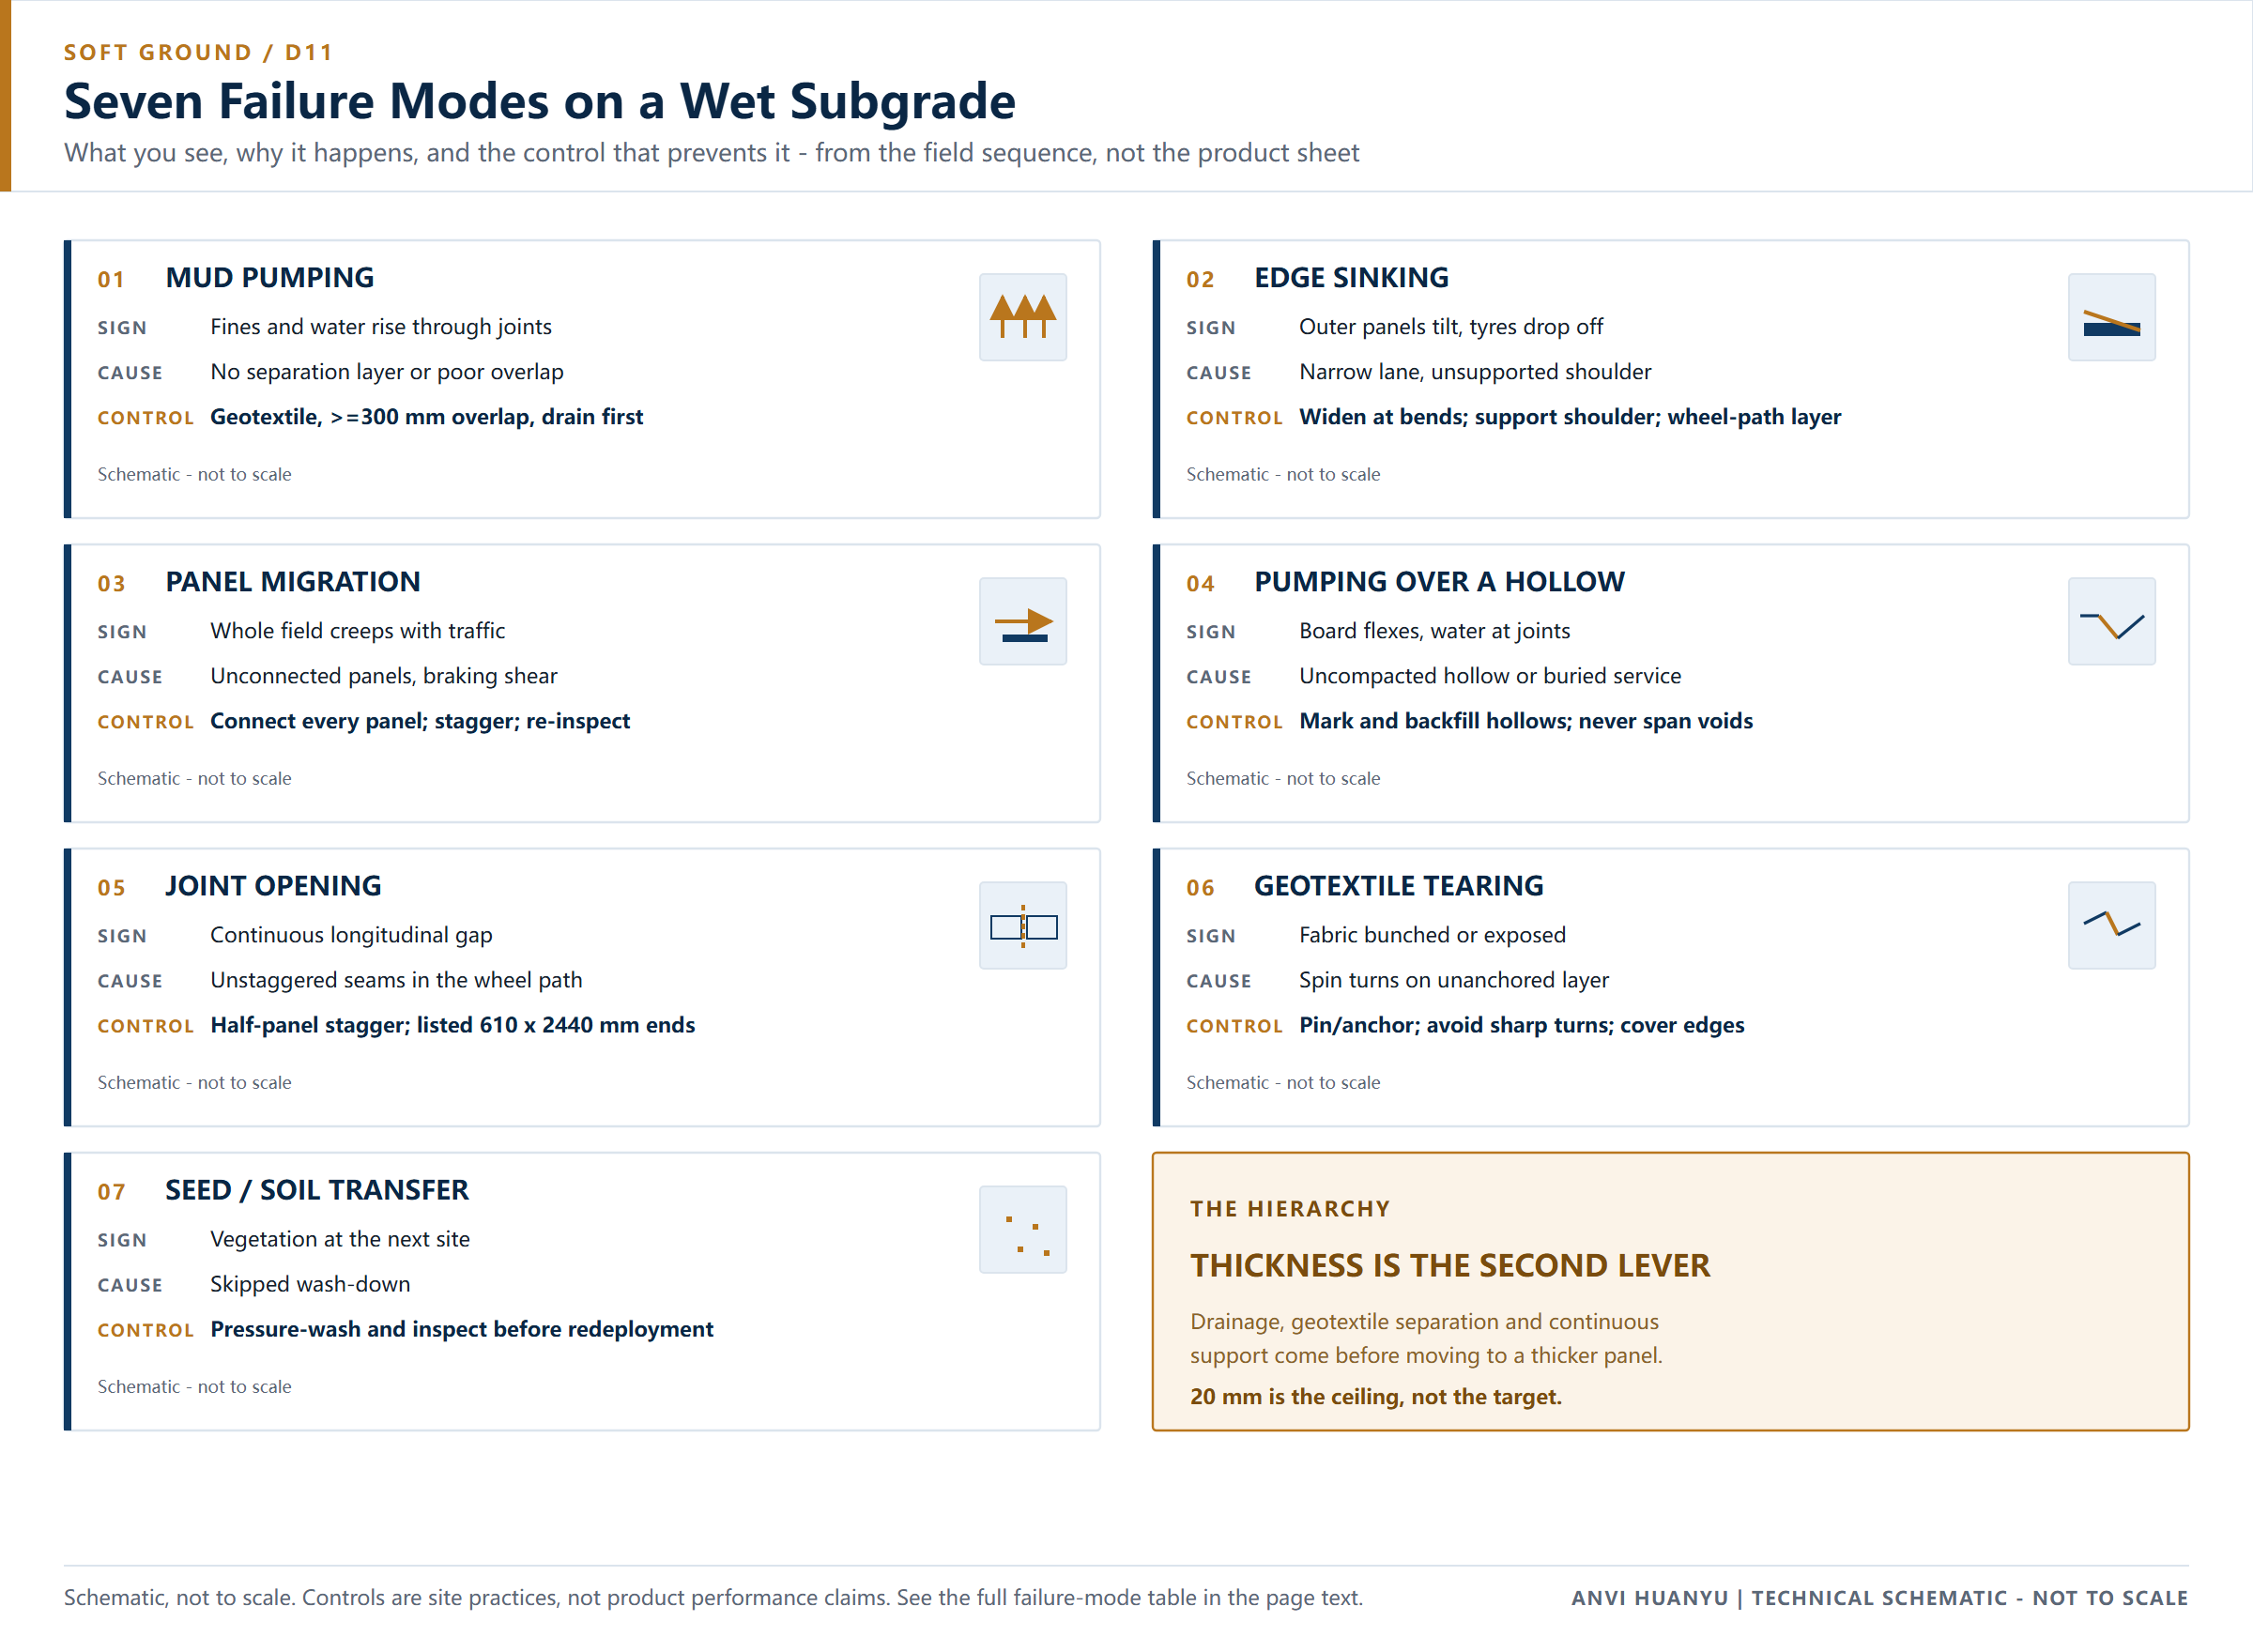
Failure modes on soft ground
| Failure | Visible sign | Cause | Prevention |
|---|---|---|---|
| Mud pumping | Fines and water rise through joints | No separation layer or inadequate overlap | Correct geotextile grade, ≥300 mm overlap, drain first |
| Edge sinking | Outer panels tilt, tyres drop off | Narrow lane, unsupported shoulder | Widen at bends; support the shoulder; add a wheel-path layer |
| Panel migration | Whole field creeps in the direction of travel | Unconnected panels, braking shear, soft base | Connect every panel; stagger; re-inspect after first pass |
| Pumping over a hollow | Board flexes, water appears at joints | Uncompacted hollow or buried service | Mark and backfill hollows separately; never span voids |
| Joint opening in the wheel path | Continuous longitudinal gap | Unstaggered seams | Half-panel stagger; use listed 610 × 2,440 mm panels at row ends |
| Geotextile tearing | Fabric bunched or exposed | Turning on an unanchored layer, sharp aggregate | Pin/anchor; avoid sharp spin turns; cover edges |
| Seed or soil transfer | Vegetation at the next site | Skipped wash-down | Pressure-wash and inspect before redeployment |
What to verify with any supplier before you buy
Soft-ground orders fail on specification detail more often than on product quality. Ask for:
- The test method and support condition behind any load figure — a rating measured on a rigid floor says little about a wet subgrade.
- Whether any derating guidance is backed by test data, or is a general industry range.
- Can a crew place and recover a panel by hand on a muddy site without plant? Test that with a sample panel on the worst ground, where a catalogue figure tells you least.
- Thickness tolerance and batch consistency — a two-layer field with inconsistent panels will not sit flat.
- The material declaration and UV stabilisation, since panels left exposed on long projects degrade differently.
- Connector specification for the expected lateral loads and whether connectors are compatible across thicknesses.
- Loading quantity per 40HQ at your chosen thickness, so the container plan matches the panel count.
- A written warranty and cleaning/handling instruction you can attach to the method statement.
Use the same eight with every bidder, ourselves included. Where a number cannot be documented, leave it out of the calculation.
A double layer in the wheel paths is also unforgiving of variation: two panels of different stiffness do not share load evenly, and on saturated clay that difference shows up as a tilted running surface within a few passes. We can provide current working photographs of our production line running, a thickness check on a finished panel, and an export container being loaded when we quote. They are photographs of our own process and show what we do, not what was measured — a photograph is not a tolerance figure, a material declaration or a derating test. Ask for the documented values separately.
Specification summary for a wet 100 m lane
| Item | Starting specification |
|---|---|
| Panel | 1,220 × 2,440 mm HDPE, dual-face tread, 4 hand holes + 8 connector holes |
| Thickness | 20 mm, as a ceiling — not the first lever |
| First layer | ≈ 82 panels, staggered, fully connected, 2,440 mm lane |
| Second layer | ≈ 82 additional panels, in the two wheel paths only |
| Order quantity | ≈ 189 panels including 15% allowance |
| Geotextile | ≈ 280 m² including overlap; grade selected for the soil |
| Sequence | Drain → separate → stagger → connect → double wheel paths → trial pass → re-inspect |
| Derating | Saturated clay −25~35%; peat/organic up to −50% (industry reference ranges) |
| Exclusions | No void spanning, no crane outriggers, no sustained steel tracks, no unbounded peat |
| Reference ratings | 80 / 100 / 120 t nominal, distributed static on firm level ground — not certified design values |
Frequently asked questions
How do I stop trucks sinking in mud? Drain the route first, roll out a geotextile separation layer, then lay connected and staggered panels with a second layer in the wheel paths. Thickness comes last. On saturated clay, expect to derate the available ground bearing capacity by 25–35% and use 20 mm panels rather than 15 mm.
Do I need geotextile under ground protection mats? On soft or fine-grained soil, yes. It stops fine soil pumping up into the joints, keeps the panel field clean for recovery, and prevents the subgrade and the running surface from mixing. On firm dry granular ground it can sometimes be omitted after assessment. Overlap seams generously and anchor the edges.
How much does soft ground reduce mat load capacity? Published industry guidance puts the bearing loss of saturated soil at 30–50% against dry compacted soil; saturated clay is commonly treated as 25–35%, peat and organic soil up to 50%. These are screening ranges, not design values — your geotechnical report governs.
Is a thicker mat better on mud? Usually not as the first move. If the failure is loss of support beneath the panel, a stiffer board does not fix it. Geotextile plus a doubled wheel path increases the engaged footprint more efficiently, and avoids the weight, handling and container penalties of a thicker field.
Can ground mats be used on peat? Only after a geotechnical assessment. On deep or unbounded peat with no bearing layer, standard HDPE panels can migrate and settle; timber bog mats, geogrid-reinforced stone or an engineered platform are often more appropriate.
Do mats damage wetlands or spread invasive species? Panels themselves protect the surface by avoiding excavation and imported aggregate, and HDPE can be pressure-washed between sites — an advantage over timber. But the permit still governs, and a documented wash-in/wash-out protocol plus a track-out mat at the exit should be in the method statement.
Get a thickness and panel count for your site
Send the route length, soil description or geotechnical report, water level, heaviest vehicle and axle group, and project duration. We will return a layered layout, panel quantity, geotextile allowance and thickness recommendation with its basis — to albert@hdpegroundmat.com or via our contact page.